The Hydro-Jaw 1200® and Hydro-Jaw 2400® make breakout and make-up faster and easier!
Hydro-Jaw® breakout machines use a heavy-duty chainlink jaw design to quickly breakout or make-up bits, DTH hammer joints, and other API tool connections to keep your operation running smoothly. Powered by a Honda 5.5 horsepower gasoline engine linked to a hydraulic pump, these units are portable and easily moved around the job site.
Hydro-Jaw® is designed to safely operate in the horizontal or vertical position. A lifting eye and forklift slots make it easy to load and unload. Diesel and electric units are available. Both units run quieter, with no exhaust fumes, and with less vibration than other gas or diesel models. With its excellent power and adjustability Hydro-Jaw® 1200 and Hydro-Jaw® 2400 are ideal for breakout/make-up in a wide range of drilling applications.
- Uses a heavy-duty chainlink jaw design
- Quick breakout or make-up
- Keep your operation running smoothly
- Operate in the horizontal or vertical position
- Used in a wide range of drilling applications

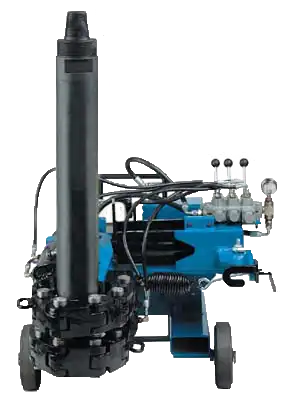
Specifications for Model 1200
| Standard Range | 5.5" O.D. to 12" O.D. |
| with Optional Jaw Package | 3" O.D. to 12" O.D. |
| Weight | 1,500 lbs. |
| Shipping Weight | 1,900 lbs. |
| Length (without handle) | 51" |
| Length (with handle) | 69" |
| Height | 50" |
| Width | 32" |
| Breakout Torque | 60,000 ft. lbs. |
| Make-up Torque | 50,000 ft. lbs. |
HydroJaw 1200 Technical Specs

| Piston Diameter (inch) | 4.25 |
| Rod Slide Area (Pull) (inˆ2) | 11 |
| Rod Diameter (inch) | 2 |
| Torque Arm (ft) | 2.19 |
| Piston Side Area (Push) (inˆ2) | 14.2 |
| Cylinder Pressure (psig) | Push Torque (ft-lb) | Pull Torque (ft-lb) |
|---|---|---|
| 500 | 15,516 | 12,080 |
| 550 | 17,068 | 13,288 |
| 600 | 18,619 | 14,496 |
| 650 | 20,171 | 15,704 |
| 700 | 21,723 | 16,912 |
| 750 | 23,274 | 18,120 |
| 800 | 24,826 | 19,328 |
| 850 | 26,378 | 20,536 |
| 900 | 27,929 | 21,744 |
| 950 | 29,481 | 22,952 |
| 1000 | 31,032 | 24,160 |
| 1050 | 32,584 | 25,368 |
| 1100 | 34,136 | 26,576 |
| 1150 | 35,687 | 27,784 |
| 1200 | 37,239 | 28,992 |
| 1250 | 38,791 | 30,200 |
| 1300 | 40,342 | 31,408 |
| 1350 | 41,894 | 32,616 |
| 1400 | 43,445 | 33,824 |
| 1450 | 44,997 | 35,032 |
| 1500 | 46,549 | 36,240 |
| 1550 | 48,100 | 37,448 |
| 1600 | 49,652 | 38,656 |
| 1650 | 51,204 | 39,864 |
| 1700 | 52,755 | 41,072 |
| 1750 | 54,307 | 42,280 |
| 1800 | 55,858 | 43,488 |
| 1850 | 57,410 | 44,696 |
| 1900 | 58,962 | 45,904 |
| 1950 | 60,513 | 47,112 |
| 2000 | 62,065 | 48,320 |
| 2050 | 63,616 | 49,528 |
| 2100 | 65,168 | 50,736 |
| 2150 | 66,720 | 51,944 |
| 2200 | 68,271 | 53,152 |
| 2250 | 69,823 | 54,360 |
| 2300 | 71,375 | 55,568 |
| 2350 | 72,926 | 56,776 |
| 2400 | 74,478 | 57,984 |
| 2450 | 76,029 | 59,192 |
| 2500 | 77,581 | 60,400 |
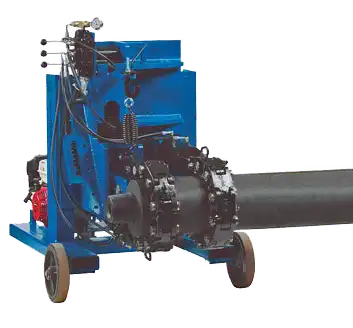
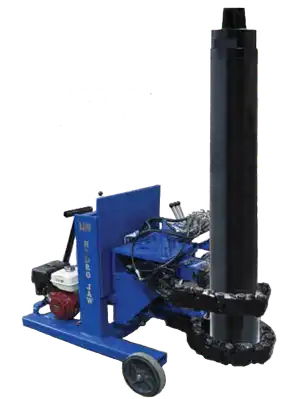
Specifications for Model 2400
| Standard Range | 12" O.D. to 20" O.D. |
| Optional Jaw Package | 8" O.D. to 12" O.D. |
| Weight | 2,400 lbs. |
| Shipping Weight | 2,700 lbs. |
| Length (without handle) | 72" |
| Height | 60" |
| Width | 48" |
| Breakout Torque | 175,722 ft. lbs. |
| Make-up Torque | 125,136.25 ft. lbs. |
HydroJaw 2400 Technical Specs
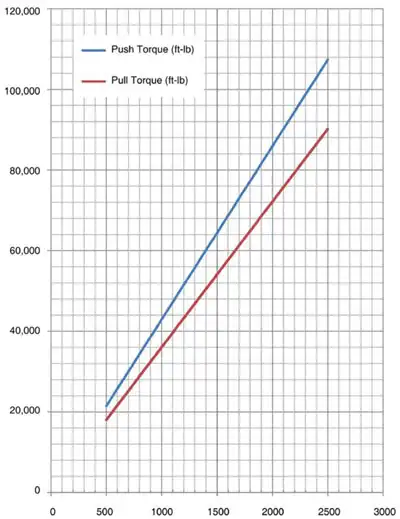
| Piston Diameter (inch) | 5 |
| Rod Diameter (inch) | 2 |
| Piston Side Area (Push) (inˆ2) | 19.6 |
| Rod Slide Area (Pull) (inˆ2) | 16.5 |
| Torque Arm (ft) | 2.19 |
| Cylinder Pressure (psig) | Push Torque (ft-lb) | Pull Torque (ft-lb) |
|---|---|---|
| 500 | 21,476 | 18,040 |
| 550 | 23,623 | 19,844 |
| 600 | 25,771 | 21,648 |
| 650 | 27,918 | 23,451 |
| 700 | 30,066 | 25,255 |
| 750 | 32,214 | 27,059 |
| 800 | 34,361 | 28,863 |
| 850 | 36,509 | 30,667 |
| 900 | 38,656 | 32,471 |
| 950 | 40,804 | 34,275 |
| 1000 | 42,951 | 36,079 |
| 1050 | 45,099 | 37,883 |
| 1100 | 47,247 | 39,687 |
| 1150 | 49,394 | 41,491 |
| 1200 | 51,542 | 43,295 |
| 1250 | 53,689 | 45,099 |
| 1300 | 55,837 | 46,903 |
| 1350 | 57,984 | 48,707 |
| 1400 | 60,132 | 50,511 |
| 1450 | 62,280 | 52,315 |
| 1500 | 64,427 | 54,119 |
| 1550 | 66,575 | 55,923 |
| 1600 | 68,722 | 57,727 |
| 1650 | 70,870 | 59,531 |
| 1700 | 73,017 | 61,335 |
| 1750 | 75,165 | 63,139 |
| 1800 | 77,313 | 64,943 |
| 1850 | 79,460 | 66,747 |
| 1900 | 81,608 | 68,551 |
| 1950 | 83,755 | 70,354 |
| 2000 | 85,903 | 72,158 |
| 2050 | 88,050 | 73,962 |
| 2100 | 90,198 | 75,766 |
| 2150 | 92,346 | 77,570 |
| 2200 | 94,493 | 79,374 |
| 2250 | 96,641 | 81,178 |
| 2300 | 98,788 | 82,982 |
| 2350 | 100,936 | 84,786 |
| 2400 | 103,084 | 86,590 |
| 2450 | 105,231 | 88,394 |
| 2500 | 107,379 | 90,198 |
 Instructions for Operation of Hydro-Jaw®
- 1. Determine the number or links needed per O.D. range.
- 2. When changing O.D. sizes, it may be necessary to add or remove links to breakout or make-up.
- 3. Wrap the stationary arm’s chain around the tool and tighten the chain cylinder by pulling the middle lever back.
- 4. To hook up the thrust cylinder arm, wrap the thrust cylinder arm chain around the tool and hook it up to the chain cylinder with the handle link pin.
- 5. Slightly tighten the chain by pulling back on the bottom lever of the control valve and then check the tool position on the jaws again. Be sure it fits into the jaws tong dies.
Breakout / Make-Up Operations
- 1. For breakout or make-up, operate by using the top lever on the control valve, this will promote the thrust cylinder arm to rotate to desired direction in order to breakout or make-up the tool joint. Pull back on the lever to breakout and push forward to make-up.
- 2. Try to maintain good contact between the jaw dies, the link dies, and the tool joint at all times.
- 3. If the tool moves away from the jaw, apply pressure on the chain cylinder from the control valve and then re-adjust the tool position toward the jaw.
- 4. Follow the same procedure for both horizontal and vertical positions.
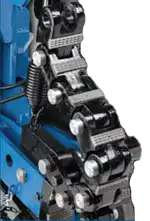
Adding Links
- 1. Set link on the last link of the chain.
- 2. Align the holes and push the pin through the links with a rubber mallet.
- 3. Install linch pin in the link pin. This will prevent the pin from falling out.
- 4. Assure the link is secure in its place.
Removing Links
- Remove the linch pin from the link pin and then slide the pin out by using a rubber mallet.
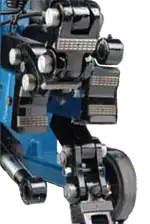
Replacing Dies
- 1. To replace a die, push the pin down through the hole in the die and disengage the pin by using a chisel and hammer.
- 2. By using the chisel and hammer, you should be able to drive the die out of the link.
Inserting Dies
- 1. Twist the die spring into the die pin.
- 2. Place spring and pin assembly into the slot of the die.
- 3. Slide the die through the dove tail slot until it touches the pin.
- 4. Push the pin down until you can slide the die over the pin.
- 5. Slide the die until the pin firmly snaps into the designated location (if the die will not slide by hand, use a rubber mallet).


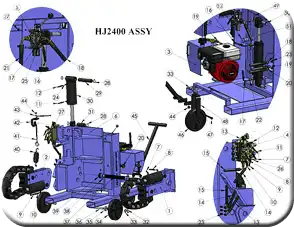
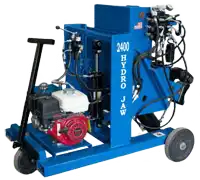 Instructions for Operation of Hydro-Jaw®